Windows 11 - Action Center won't open

Fix 1 – Restart the File Explorer application
You can fix this one-time problem by simply restarting File Explorer.
1. To open the File Explorer, first press Windows key+E together. Once it appears, minimize it.
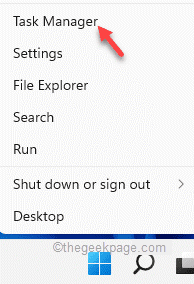
2. To access Task Manager, right-click on the Windows icon on the taskbar and select "Task Manager".
3. Click on the "Windows Explorer" process in the Task Manager and then click "Restart" to restart the process.
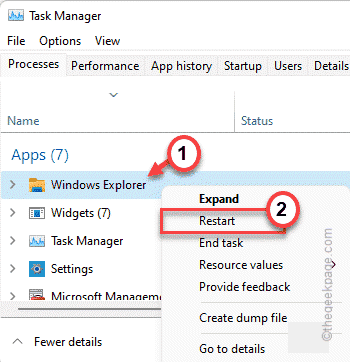
For a few seconds, the taskbar and desktop will appear white and unresponsive. Try using the Action Center once everything has returned to normal.
Fix 2 – Using GPOs
[ONLY FOR BUSINESS AND PRO EDITIONS]
Your administrator can block access to the action center through Group Policy settings.
1. Press Win+R together first.
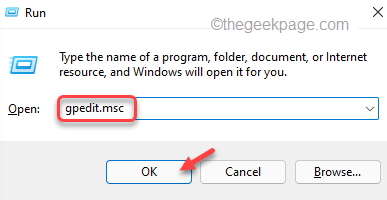
2. Click on "OK" after typing in "gpedit.msc".
3. The Local Group Policy Editor will open.
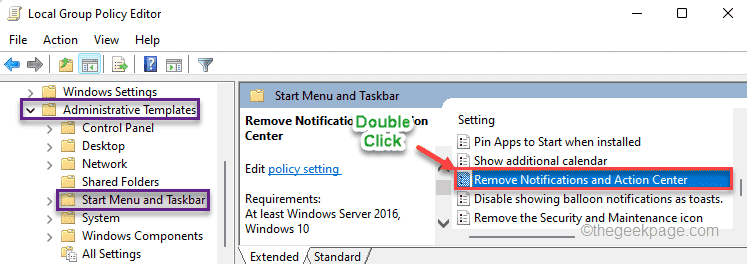
"User Configuration > Administrative Templates > Start Menu and Taskbar"
4. "Remove Notifications and Action Center" policy settings can be found on the right-hand side.
5. You can adjust the settings by double-clicking the policy.
6. Tap on "Disabled" to turn off the policy.
7. Lastly, tap on "Apply" and "OK" to save your changes.
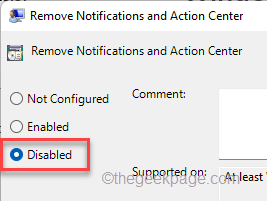
Once your changes have been saved, close the Group Policy Editor. You should restart the computer for the changes to take effect. You will be able to use Action Center again after rebooting the device.
Fix 3 – Registering the device
Using this registry hack on your system may help you if the group policy solution doesn't work.
1. Select "Run" from the right-click menu of the Windows icon.
2. Type "regedit" and click "OK." to access the Registry Editor.
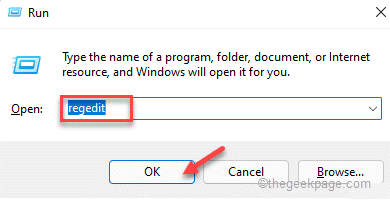
Registry editing can result in a system crash. Backup your registry if it does. These are the steps you need to take.
Once the Registry Editor is open, click on "File". Make a new registry backup by clicking "Export".
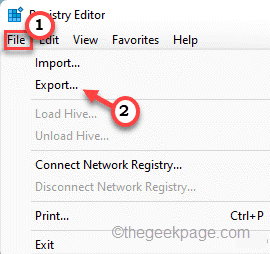
3. Add the following to the left.
"Computer\HKEY_CURRENT_USER\Software\Policies\Microsoft\Windows"
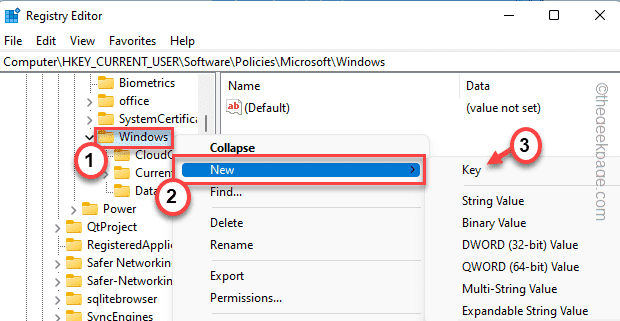
4. On the left-hand side, right-click on the "Windows" key.
5. By clicking "New>" and "Key" at the same time, you can create a new sub-key.
6. Then name it "Explorer".
7. DWORD (32-bit) Value can be created by right-clicking and tapping "New>".
8. Name the value "DisableNotificationCenter".
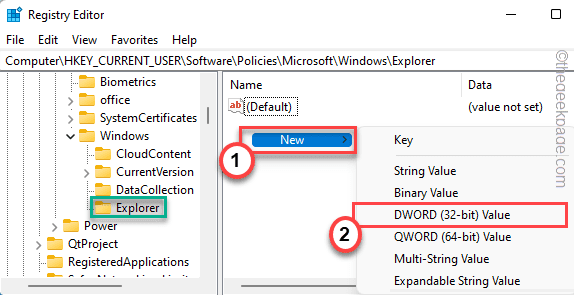
9. By double-clicking "DisableNotificationCenter", you can now edit it.
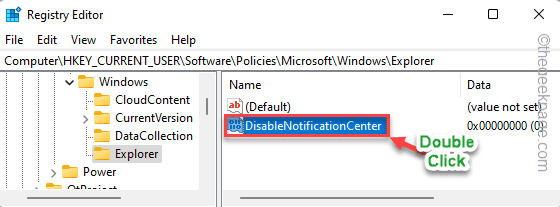
10. Enter "0" as the value.
11. When you are finished, click "OK."
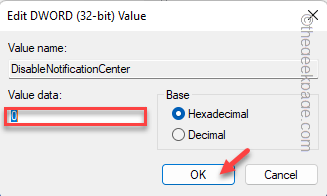
Once you have finished all the steps, close Registry Editor. The changes will take effect after you restart your computer.
Action Center will begin to behave normally after you restart.
Fix 4 – Run PowerShell
Action Center can become corrupted during system upgrades.
1. Press the Windows key and type "powershell" into the search box.
2. You can open the terminal with administrative rights by right-clicking on "Windows PowerShell" and selecting "Run as administrator."
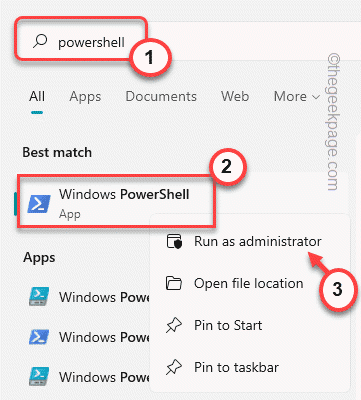
3. Enter the commands one by one into the PowerShell terminal and hit Enter to execute them sequentially.
Close the PowerShell window after you have executed these commands and restart the system.
"Get-AppxPackage Microsoft.Windows.ShellExperienceHost | foreach {Add-AppxPackage -register "$($_.InstallLocation)\appxmanifest.xml" -DisableDevelopmentMode}"
"Get-AppXPackage | Foreach {Add-AppxPackage -DisableDevelopmentMode -Register "$($_.InstallLocation)\AppXManifest.xml"}"
You should now be able to use Action Center.
Fix 5 – Name UsrClass.dat to customclass.dat.
The per-user CLASS information storage file can be corrupted while upgrading the system.
1. Press Windows + R simultaneously.
2. Click "OK" to copy the location.
"%localappdata%\Microsoft\Windows"
3. Find the "UsrClass.dat" file at the bottom of the folder.
In case you can't find it, it may be hidden. Make sure that all the folders and files are not hidden.
1. Click the three-dot menu after opening the File Explorer.
2. You can then select "Options" from the drop-down menu.
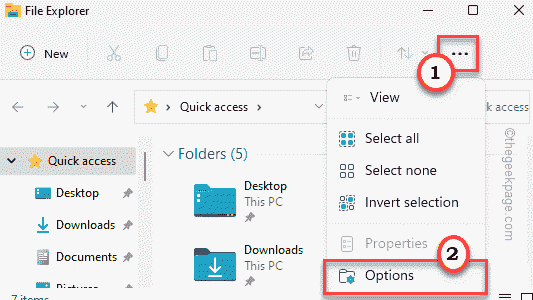
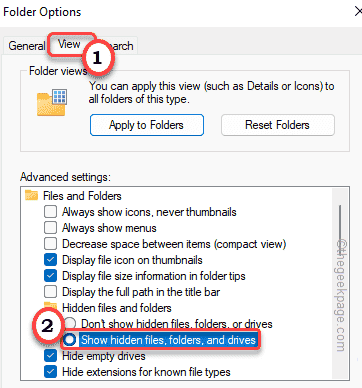
3. Now, go to the “View” tab.
4. Once you have selected the option "Show hidden files, folders, and drives," click the radio button.
5. Select "Apply" and click "OK".
Return to the folder and continue the process.
4. To rename the file, right-click on the "UsrClass.dat" file and select "Rename".
5. The new name should be "UsrClass.original.dat".
Exit File Explorer. Restart your computer and try to access your Action Center again.
Fix 6 – Scan with SFC and DISM
If you have tried everything and nothing works, run an SFC and DISM scan on your computer.
1. At first, press the Windows key and the R key simultaneously.
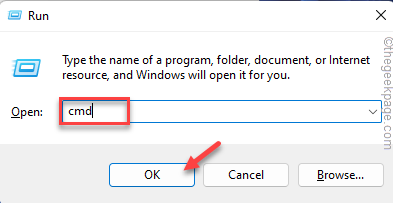
2. In order to access the terminal with administrative rights, type "cmd" and press Ctrl+Shift+Enter together.
3. In the terminal, type the following command and hit Enter to run the DISM check.
"DISM.exe /Online /Cleanup-image /Restorehealth"
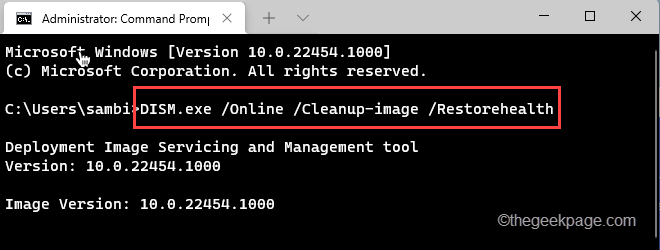
Let Windows finish its DISM scan.
3. Then run an SFC scan by pasting this command after running the DISM scan.
"sfc /scannow"
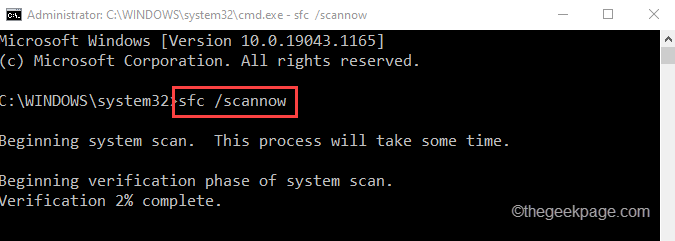
Close the Command Prompt once the scanning process has reached 100%, then reboot your computer.
You will be able to solve your Action Center problem.
You May Also Like!
-
-

- The Best Ways to Lower Your Ping
-
-
-

- Kernel Security Check Failed
-
-
-

- Comparison of Microsoft 365 Family, Personal, and Free
-
-
-

- How to Wire Your Home Ethernet
-
-
-

- Best Remote Desktop Connection Manager
-
-
-

- Fix “Internet is not accessible, secured” WiFi network error
-
-
-

- Unifi Network Calculator
-
-
-

- Installing Java on a Raspberry Pi
-
-
-

- Connected to WiFi, but no Internet? Fix it in 5 minutes!
-


.png)


