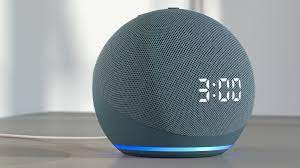
How to Delete Alexa Voice History From Echo Devices

In this video, we show you how to delete Alexa Voice History from Echo devices. Using smart speakers and assistants has become a lot more common in the last few years. Having Google's Nest speakers and Amazon's Echo devices that are cheap has led to a big rise in the use of smart assistants over the years. Smart speakers, on the other hand, are easy to use, but one thing that worries people about them is their privacy.

Smart speakers have microphones that are always listening for the right word. Then, they also keep a record of and store your questions so that they can be answered more quickly. The microphone can also record any private conversations that people have when they're close to a speaker. This may bother some people. It's a good idea to delete Alexa's voice history from Echo devices to get rid of this.
This is how to get rid of your Alexa voice history if you have an Amazon Echo speaker.
Keep your ALEXA VOICE history
When you interact with a smart speaker, it learns from that interaction and gets better over time at giving you better answers to your queries. They learn how you use your computer and store relevant information. As soon as you ask a question, the details of the question are stored on servers under your account. A lot of this data is used by Amazon to improve speech recognition and the accuracy of search results.

The fact that an Amazon Echo with Alexa, or almost any smart speaker, has an always-on microphone can be a cause for worry. In the future this could lead to targeted ads and a breach of privacy. So, it's a good idea to delete your Alexa voice history from time to time.
In this video, I show you how to delete your phone's voice history of Alexa.
How do you get rid of the voice history of Alexa? There are two ways. Use the Alexa app on your phone to start. These steps are the same for Android and iOS. They work the same way. The steps are here.
Step 1: Open the Alexa app on your smartphone and navigate to the ‘More’ tab on the bottom right corner.

Step 2: Go to the ‘Settings’ page.

Step 3: Select ‘Alexa Privacy’.

Step 4: Now, tap on the ‘Review Voice History’ option.

Step 5: You will now see an option to filter your voice history by date. Select ‘All History.’

Step 6: Your entire Alexa voice history will appear. This will give you an idea about all the stored data.
Step 7: Select ‘Delete all of my recordings.’

Step 8: Tap "Delete" again when asked to do so. All of your voice messages to Alexa have now been wiped clean.

It tells you how to get rid of Alexa's voice history from your ECHO SPEAKER.
The way to delete your Alexa voice history by speaking to the speaker is to do it this way: Note that you'll have to set this up in the Alexa app before you can use it for the first time. Once the command is enabled, you can just say it the next time you want to do it.
Step 1: Open the Alexa app on your smartphone and navigate to the ‘More’ tab on the bottom right corner.

Step 2: Go to the ‘Settings’ page.

Step 3: Select ‘Alexa Privacy.’

Step 4: Scroll down and find the ‘Manage Your Alexa Data’ option. Tap on it.

Step 5: Toggle the switch next to ‘Enable deletion by voice.’ Then tap on ‘Confirm’ when prompted.


Step 6: You can now give voice commands to Alexa to delete your voice history. You can say: “Alexa, delete my entire voice history.”
HOW TO SET ALEXA'S VOICE HISTORY TO REMOVE ITSELF.
It's possible to set up Alexa to automatically delete your voice history if you don't want to do it yourself or think you might forget. You can do this through the app on your phone. The steps are here.
Step 1: Open the Alexa app on your smartphone and navigate to the ‘More’ tab on the bottom right corner.

Step 2: Go to the ‘Settings’ page.

Step 3: Select ‘Alexa Privacy’.

Step 4: Scroll down and you will find the ‘Manage Your Alexa Data’ option. Tap on it.

Step 5: Now, select ‘Choose how long to save recordings’ at the bottom of the screen.

Step 6: For the first time, you can now choose how long you want your recordings to be kept. You can also choose "Do not save recordings" if you don't want Alexa to keep any of your recordings in the future. As soon as everything is done, tap on "Confirm." Tap "Confirm" again when asked to do so.


This will let you set how often your Alexa voice history will be deleted. Keep in mind that if you don't save any recordings at all, the accuracy of Alexa's answers to your questions may be thrown off.
CARE FOR YOUR PRIVACY FIRST.
Making sure that you don't have any of your Alexa voice history will make you feel better. The best thing to do if you are worried about privacy is to delete your Alexa voice history from your account.
You May Also Like!
-
-

- Windows 11 - Action Center won't open
-
-
-

- The Best Ways to Lower Your Ping
-
-
-

- Kernel Security Check Failed
-
-
-

- Comparison of Microsoft 365 Family, Personal, and Free
-
-
-

- How to Wire Your Home Ethernet
-
-
-

- Best Remote Desktop Connection Manager
-
-
-

- Fix “Internet is not accessible, secured” WiFi network error
-
-
-

- Unifi Network Calculator
-
-
-

- Installing Java on a Raspberry Pi
-


.png)


